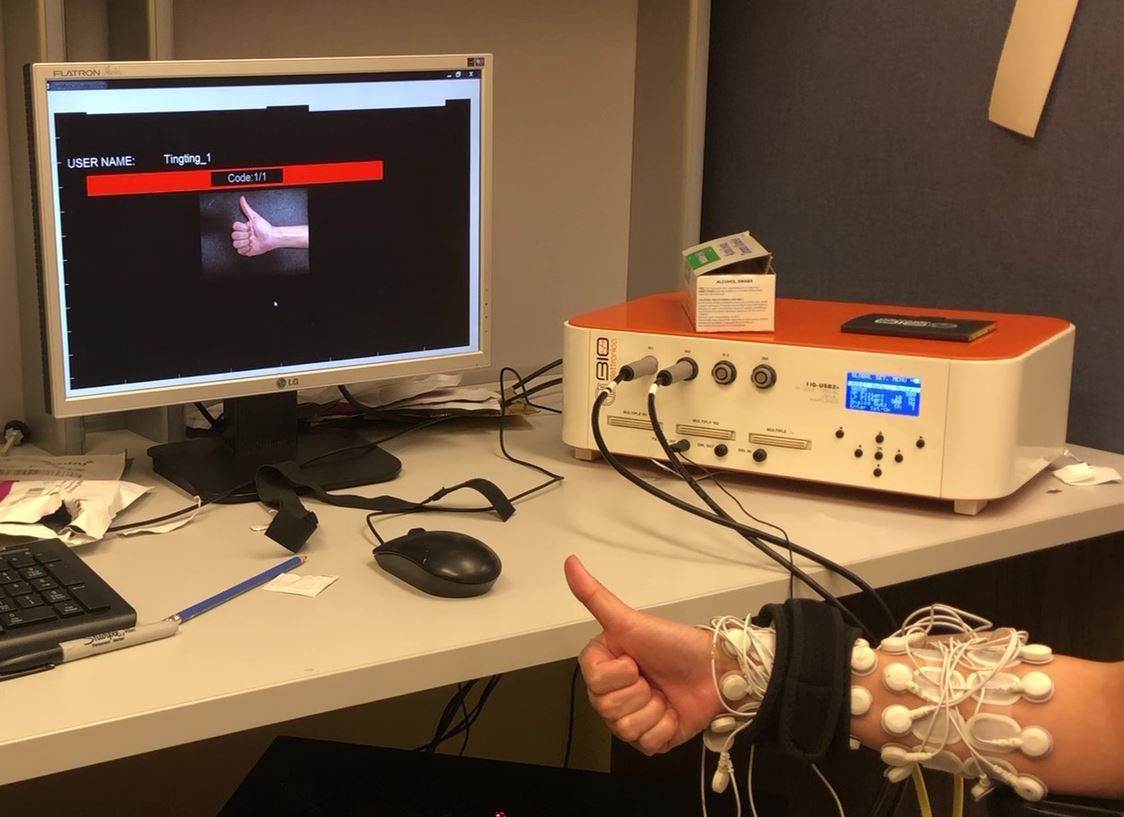
PID control for Haptics

The objective of the project was to explore force feedback designs using the Haply device. For this assignment, we were supposed to regulate the Haply movements using Proportional (P), Integrative (I) and Differentiate (D) control. Some fundamental questions regarding PID control were answered through this project.
P controller
How does it feel? What happens when you change the target position? What does changing the P parameter do? Do you notice any problems?
When trying out the P controller we noticed the end effector does move towards the target but the system is not stable and overshoots if the new target is not close to the last one. This component is the most important because without P the device won’t move, as P is increased the force and accuracy of the end effector also increases until it starts being unstable. We played around with the P values starting at 0.1 and adding 0.1 every time. The best performance was achieved with a P of 0.3, and after increasing the P over 0.5 we found that it became too unstable. At first, there was no movement even with increasing the P-gain till 0.04, but I could see the force arrow increasing in magnitude. When I removed the end effector from the starting position, the end effector moved to the target position rapidly, this was probably due to a high P gain of 0.04. On changing targets positions, I noticed that if they were close, there was no effective movement, while with the far ones the end effector didn’t really reach the targets. This was due to the steady-state error as discussed in the tutorial. Reducing the P gain to 0.01 didn’t move the end effector at all. On slowly increasing the P value, we could see the change in force and hence the speed of reaching targets. Using P greater than 0.05, the Haply became unstable/unresponsive after reaching some targets.
D controller
How does this change the behavior of the Haply? Are there any problems?
For the next part, the D component was introduced by increasing the D gain. With just the D gain there was no movement. With both P and D gain values, the control was much better than only using the P controller. The end effector moved smoothly to the targets. Increasing the smoothness higher than 1 made it really smooth movements to the targets, however, the response became delayed. There were still some gaps due to the steady-state error but relatively better than just the P controller. This was probably the only problem using a PD controller.
I controller
How does it feel? What happens when you change the target position? What does changing the P parameter do? Do you notice any problems?
Adding the I value to the PD controller increased the force value a lot and there was a big gap. This is due to the inherent principle of an integrator where the errors add up. The UI provides a reset integrator button to deal with this problem. Upon reset, the control is ideal where the haply avatar is able to reach the target and the control is smooth as well. A stable system using the following parameters could be reached: P=0.03, I= 0.1, D=0.4, Smoothing = 0.8, looptime = 1000.
Follow the path: Circle
Implement path tracking, specifically, replace the random position by a position following a track over time (e.g., a circle or square). What happens when you hold the handle ? How is it affected by the PID parameters?
For this part of the assignment, I chose to draw a circle so we could analyze the resolution of the Haply device as it involves fine movements on the outline of the circle. This is the code I used to generate the circle. I passed the loop time as an input argument so that the target generation is controlled as well
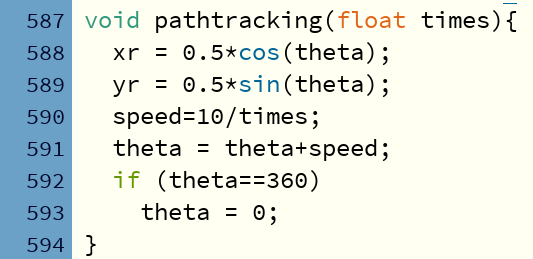
The previous values of P: 0.03, I: 0.00001, D:0.4 seemed inadequate to keep the Haply avatar on the circle. So I changed them to P: 0.06, I: 0.00002, D:0.6, and with this the Haply end effector and the avatar could follow the circle path. Initially, I had to hold the end effector so that it reaches the circular trajectory and after that, it could follow it even without holding the end-effector as shown in the video.
Looptime Changes
As hinted, the idea was to use looptime to change the controller update rates. With random targets, I observed there was a lot of oscillations and unsteadiness. However, changing the parameters of P, I and D was able to get better steadiness. If the looptime is increased (sampled slower) the end effector will start oscillating. If the looptime is decreased (sampled faster) the end effector was able to adjust to change and therefore the control was steady. The random looptime change was added to the code using the following segment.

For best observing the effect of controller updates, I decided to use the circular follow path. As you can see I use the looptime slider bar to increment the looptime value. The Haply end-effector and the circular trajectory both slow down. The Haply was able to accommodate change in looptime and there was steady control. While using the random control rates, I noticed at one stage it got unsteady and there were random oscillations.
Reflection:
Through this assignment, I was able to understand more about PID control and how it could be used to stabilize the Haply end effector. This will help me with my course project. One observation was sometimes there is an abrupt movement that crashes the encoder readings and we have to start the code again. A solution to this could be to hold the end-effector, where I noticed that doing so was able to absorb some of the forces. This allowed to keep the code running.
I would like to acknowledge my lab partner Ana Lucia and our lab instructor Karthik, I wouldn’t have been able to do this without their help and support.
The code for the interface is available here: https://github.com/pradhanashirbad/canhap_PIDcontrol